
Assist! Your picture appears to be like like one thing out of an early 2000s online game. Are you caught with it like this or is there a great way to depixelate a picture in Photoshop?
Hey there! I’m Cara, a self-declared lover of all issues Photoshop and I’m actually glad you requested. Earlier than you hand over on that picture let’s check out the best way to depixelate a picture in Photoshop.
Needless to say you may’t miraculously get a high-quality excessive decision picture from a pixelated picture. Nonetheless, you may clear it up a bit. Let’s have a look!
Observe: the screenshots within the tutorial under are based mostly on the Home windows model of Photoshop CC. In case you are on a Mac, they could be a bit completely different.
Desk of Contents
Step 1: Add Some Pixels
Let’s check out this picture I downloaded from Pixabay.com. If we zoom in on the chook’s eye, we are able to see that there’s a little bit of pixelation within the picture.

If you happen to’re making an attempt to print a picture, you typically need your decision to be set at 300 ppi (pixels per inch). Nonetheless, right down to 72 ppi is completely acceptable for viewing on a display screen. Photos downloaded from the online typically come at this decrease decision.
If you happen to’re having bother with pixelation, it’s seemingly that the decision is low. Let’s begin by bumping it up. Go to Picture within the menu bar and select Picture Dimension.

The decision of this picture is about at 96 ppi. Let’s change it to 300 ppi. Make it possible for the resample field is checked. Photoshop will attempt to intelligently fill within the appropriately coloured pixels to deliver up the decision whereas shedding as little high quality as doable.

Click on OK. This could already clear up a few of the pixelations however let’s take a look at what we are able to do additional.
Step 2: Despeckle Filter
Earlier than we begin including filters, let’s make these edits non-destructive. Press Ctrl + J or Command + J to duplicate the picture. Proper-click on the duplicate layer and select Convert to Sensible Object.
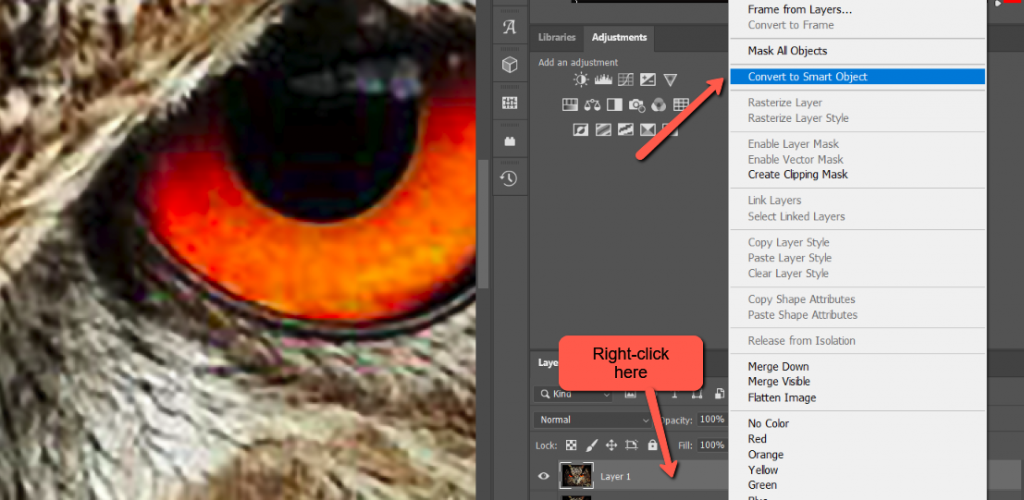
This makes the filters we’re going so as to add subsequent editable so you may come again and make changes.
Go to Filter within the menu bar, hover over Noise and select Despeckle. You are able to do this a few instances for those who like. Press Alt + Ctrl + F or Possibility + Command + F to reapply the identical filter.

This can assist clean the pixelated edges just a little.
Step 3: Gaussian Blur Filter
To additional soften the sides, you may add a Gaussian Blur filter.
Go to Filter, hover over Blur, and select Gaussian Blur.

Within the field that opens, select the Radius quantity. Extra pixels imply extra blur and just a little goes a great distance for this system. I’ve received mine set at 0.3 pixels.

Select what works on your picture and press OK.
Step 4: Unsharp Masks
Now, we’ve blurred issues a bit with the primary two filters so let’s outline the strains with a sharpening filter. Go to Filter hover over Sharpen and select Unsharp Masks.

Watch out to not go too loopy with these values or the picture will look oversharpened. That is very true in photos of individuals. Oversharpening pores and skin augments wrinkles and blemishes and simply doesn’t look good. We are able to push it just a little on this picture to outline the feathers.

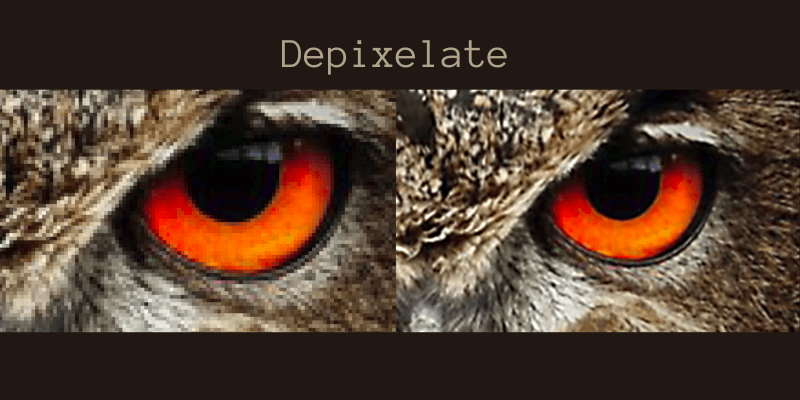
And right here’s the ultimate product!

Earlier than:
After:

It’s fairly spectacular how a lot of a distinction it could possibly make!
Interested by different issues you are able to do in Photoshop? Take a look at our article on resizing photos with out shedding image high quality.