
Has this ever occurred to you? You’re engaged on a challenge for a shopper however they despatched you their brand with a background. Argh!
Hey there! I’m Cara and I perceive the frustration when purchasers don’t ship you what you want. I additionally perceive the frustration of attempting to elucidate the error to them and getting the best data. If there’s an opportunity to keep away from the back-and-forth, I’ll take it.
Within the case of logos with a background, Photoshop presents a number of simple strategies for eradicating backgrounds. Which one you’ll use relies on the actual brand you’re working with. Let’s take a better look!
Notice that the tutorial and screenshots under are from the Home windows model of Photoshop CC. In case you are on a Mac, they are often totally different.
Desk of Contents
Why Does the Emblem Must Be Clear?
Having a background behind the emblem isn’t all the time an issue. For instance, a brand’s white background received’t present up in case you’re inserting it on a white web page.
However what if you wish to put the emblem on a picture? You’ll find yourself with an apparent background behind it, like this.

You’d fairly have one thing like this.

Let’s take a look at how one can make it occur!
Technique 1: Shade Vary
As with many duties in Photoshop, there may be a couple of approach to do issues. Completely different strategies will work higher relying on the state of affairs. Let’s take a look at just a few strategies so you’ve gotten choices.
First up is the Shade Vary software. Go to Choose within the menu bar and select Shade Vary.

Within the dropdown menu on the high, inform Photoshop you need to work with Sampled Colours. Then click on on the white background. You’ll discover that your cursor is an eyedropper and also you’re choosing the background colour.

On the backside of the field, you possibly can choose Grayscale for the Choice Preview to show your brand black and white. Every little thing that’s white is chosen, every little thing that’s black isn’t.
My brand has some grey components as a result of there are semi-transparent elements. This isn’t one of the best choice technique for this brand as a result of among the clear elements is not going to get chosen.
However for the instance’s sake, let’s proceed. Modify the fuzziness slider to make sure that each a part of the background colour is excluded from the choice. Keep in mind, a better quantity means Photoshop will choose a wider vary of comparable colours to the sampled one.
While you’re proud of the choice, hit OK.

You’ll find yourself with a variety across the brand. To take away the background, press the Masks button on the backside of the Layers panel. It appears to be like like a rectangle with a circle within the middle.
The background will flip clear. This isn’t the tip as a result of there may be nonetheless an issue you’ll want to repair.
A skinny line of white fringing is left across the outdoors of the emblem once you hit the masks button. However since this downside seems with all of the strategies, let’s tackle it on the finish of the article.
Technique 2: Magic Wand Device
For now, let’s transfer to the following choice technique. The Magic Wand software works equally to the Shade Vary software, however the outcomes can generally be totally different.
Choose the Magic Wand software from the toolbar on the left. It’s typically hidden behind the Fast Choice software. Simply right-click to open the choices and choose the Magic Wand.

Up within the Choices bar, let’s set a few issues earlier than we use the software. Since we need to choose a plain white background, deliver down the tolerance. We don’t want to pick out a colour vary, only one shade.

My brand has some clear elements contained in the design so I unchecked the Contiguous field. This enables Photoshop to pick out each pixel of the sampled colour no matter whether or not it’s touching the world the place you clicked.
See how Photoshop chosen the white elements inside the emblem though they’re remoted from the principle white half outdoors the emblem the place I clicked?

On this case, the background is chosen fairly than the emblem, so we have to invert it. Discover how there are marching ants across the fringe of the background?

Press Ctrl + Shift + I or Cmd + Shift + I to invert the choice. You can too go to Choose and select Inverse.

You’ll see the marching ants across the edge have disappeared.

Hit the masks button on the backside of the Layers panel to take away the background.

Technique 3: Channels
Open the channels panel, which often seems as a tab within the Layers panel space. If it’s not there, go to Home windows and click on Channels to deliver it up.
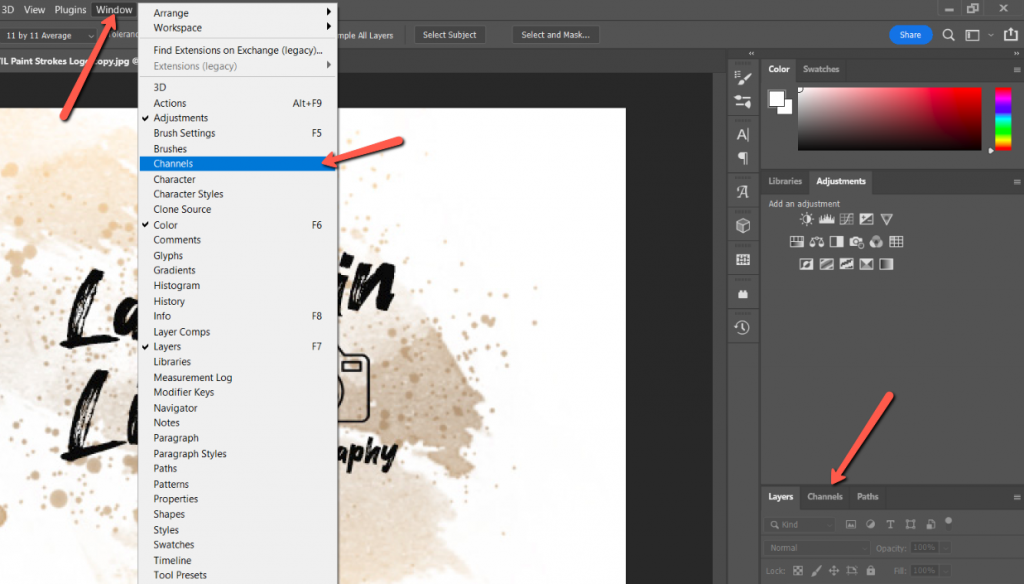
Click on via and take a look at every channel individually to find out which one presents probably the most distinction. For this brand, it’s the blue channel.

Click on on the blue channel and drag all the way down to the plus check in a sq. to make a duplicate.

With the copy layer highlighted, press Ctrl + L or Command + L to open the Ranges panel. Drag the sliders till your brand is black and the background is white.

Due to the semi-transparent elements of my brand, I needed to go fairly excessive, however more often than not you simply must tweak them somewhat. Click on OK when prepared.

Maintain down the Ctrl or Command key whereas clicking on the copy channel thumbnail. It will create a variety.

Once more, the choice is across the background so press Ctrl + Shift + I or Command + Shift + I to invert it. Change again to the Layers panel and press the masks button to make the choice.
Coping with Fringing
As we talked about earlier, there may be nonetheless an issue that seems once you hit that masks button. Earlier than you pat your self on the again and proceed in your merry approach, you could take care of the fringing.
More often than not once you minimize one thing out of a white background there will probably be somewhat white line operating across the outdoors edge. You’ll be able to’t see it towards the sunshine checkerboard background that signifies transparency, however it’s often there.
To test for fringing, place a dark-colored background behind your brand so you possibly can see. Click on the half-filled circle icon and select a Strong Shade adjustment layer.
Choose a darkish colour from the colour picker and hit OK.
Seize the colour fill layer and drag it down under the emblem layer to place it behind the emblem.
Now, look intently on the brand. See the white fringing across the edges?
To eliminate it, you could contract the choice. This must occur earlier than you hit the masks button when slicing out the choice. Go to Choose hover over Modify and select Contract.
You’ll be able to select by what number of pixels you need to contract the choice. My brand isn’t very massive so I’m going to stay with 1 pixel. Click on OK.
Now hit the masks button and examine your picture to make sure that the white fringing doesn’t seem.
Save as a PNG
Now the ultimate step.
Have you ever ever had bother saving a picture with a clear background? It appears to be like nice in Photoshop however once you save the file, it opens with a white background. Which may even be what occurred to your shopper after they despatched you their brand file.
What’s going on?
You’ll be able to’t save a picture with a clear background as a JPEG. The file kind doesn’t assist clear backgrounds and can all the time fill in transparency with white.
As a substitute, you must use the PNG file kind. To save as a PNG go to File, hover over Export, and select Fast Export as PNG.
Browse to the place you wish to put it aside, select a file identify, and click on Save. Now your picture ought to seem accurately with a clear background.
That was numerous data. I hope it was useful!
to study extra about when to make use of which file kind — JPEG, PNG, or GIF? Try our rationalization right here!