
Portrait retouching is among the commonest makes use of of Photoshop in all the world. Whether or not it’s an engagement photoshoot, knowledgeable headshot, or {a magazine} vogue shoot, you at all times need your fashions to look their best possible.
Because of this, an enormous period of time is spent on pores and skin smoothing edits, however there’s a new Photoshop characteristic that may dramatically pace up and simplify your portrait retouching: the Pores and skin Smoothing neural filter.
For those who haven’t explored them earlier than, neural filters are in all probability essentially the most thrilling factor to occur in Photoshop in a very long time.
They’re the newest product of latest advances in AI machine studying methods, they usually’re all nonetheless technically in beta testing, however a lot of them are value exploring already – particularly Pores and skin Smoothing.
Right here’s how you need to use the newest tech with your personal pictures!
Desk of Contents
The Fast Information to Clean Pores and skin in Photoshop
Right here’s a fast overview of a contemporary pores and skin smoothing course of:
- Step 1: Use the Spot Therapeutic Brush to take away any blemishes.
- Step 2: Launch the Pores and skin Smoothing Neural Filter.
- Step 3: Modify settings till the pores and skin has been sufficiently smoothed.
That’s all there may be to it! Neural Filters do all of the heavy lifting and prevent an enormous period of time. If you wish to take a better have a look at how the method works and be taught a bit extra concerning the different enhancements it brings, then learn on!
Smoothing Pores and skin in Photoshop With Neural Filters
(Notice: the inventory picture used on this tutorial is from Unsplash.com, courtesy of person Anamnesis)

As at all times, remember that many individuals pleasure themselves on their magnificence marks or birthmarks, so be sure you examine along with your topic earlier than continuing – particularly in the event that they’re a consumer! A fast dialogue can head off loads of future points.
Step 1: Spot Therapeutic
Earlier than you get began with the Pores and skin Smoothing neural filter, it’s a good suggestion to take away any massive blemishes out of your topic’s pores and skin.
The Pores and skin Smoothing filter can typically take away them too, however the settings required can even look a bit over-processed, so it’s typically higher to take away blemishes first with a extra exact device.

Create a brand new layer to carry all of your spot therapeutic pixels by urgent the keyboard shortcut Command + Shift + N (use Ctrl + Shift + N when you’re utilizing Photoshop on a PC). Give your new layer a descriptive title and click on OK.
Change to the Spot Therapeutic brush utilizing the toolbox or the keyboard shortcut J. Within the device choices bar on the prime of the principle doc window, guarantee that the Sort setting is Content material-Conscious, and that the Pattern All Layers field is checked.

Click on every blemish to take away it, adjusting your brush measurement as essential.

Step 2: Layer Prep
Neural filters solely work on the presently chosen layer, so that you’ll have to duplicate your spot therapeutic and background layers after which merge the copies to create a working layer for the Pores and skin Smoothing filter.
Maintain the Shift key and click on every layer within the Layers panel to pick them each, then right-click one in all them and select Duplicate Layers from the popup menu.

Within the Duplicate Layers dialog field, guarantee that the Vacation spot doc is your present working doc, and click on OK.
The 2 layers can be duplicated, as you possibly can see within the Layers panel. Proper-click them once more, and select Merge layers.
The 2 layers can be flattened right into a single layer that we will use with the Pores and skin Smoothing filter, however we’ll additionally nonetheless have a backup copy of our unique picture and our spot therapeutic layer.
Step 3: The Pores and skin Smoothing Filter
Eventually, it’s time to fireside up the brand new filter and see the way it works. Ensure that your newly merged layer is chosen, then open the Filters menu and click on Neural Filters.

Photoshop will launch the Neural Filters window, which lets you experiment with all of the AI-based instruments that they’re testing.
You might have to obtain them individually, relying on whether or not or not you’ve used them earlier than, but it surely’s so simple as clicking the small cloud obtain icon beside every entry within the record.

This picture solely has one face seen and one face detected, however for group pictures, you possibly can alter every face individually.
On this instance, even the default settings create a really clean pores and skin look, maybe even over-softened – however that’s fully automated with no handbook smoothing required in any respect!

Modify the settings till you’re pleased with the outcomes, then ensure the Output setting is New Layer and click on the OK button.
Photoshop ought to have already completed all of the processing in the course of the preview part, so your new layer needs to be able to go!

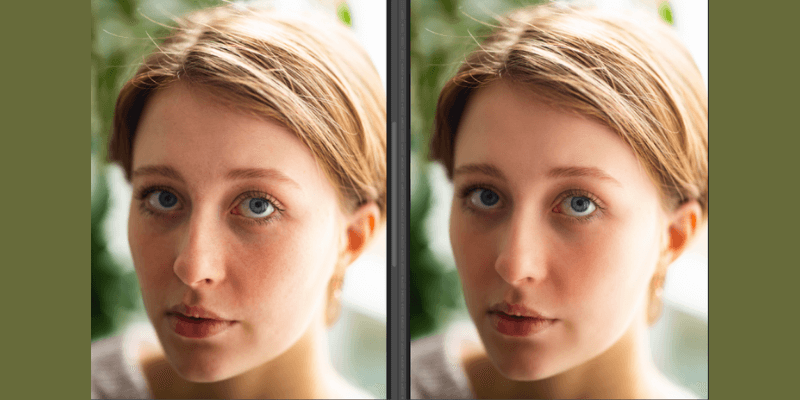
Spot elimination solely on the left, Pores and skin Smoothing filter with default settings on the fitting
Since you’ve received the smoothed model on a separate layer, you too can add a layer masks if you wish to have extra management over the placement of the smoothing impact.
On this case, the smoothing is a bit too noticeable across the mannequin’s eyes, so a fast layer masks and a little bit of brushwork will permit the unsmoothed eyes to point out via extra clearly.
That being mentioned, I’m very impressed with the outcomes of the Pores and skin Smoothing filter, and I believe it’s presently one of the best ways to clean facial pores and skin in Photoshop. Strive it out your self and see what you suppose!
Smoothing Pores and skin Manually In Photoshop
It’s additionally attainable to clean pores and skin manually in Photoshop, however it is a lengthy and sophisticated course of that makes use of some unusual Photoshop methods like high-pass filters and mixing modes – and I’m not satisfied that it does a greater job than Neural Filters.
The outcomes typically look extraordinarily synthetic to me, and that’s after spending fairly a very long time doing multi-stage handbook changes.
A Ultimate Phrase
Hopefully, you’ll agree that the Pores and skin Smoothing neural filter gives a promising method to get high quality outcomes in a short time with a minimal of retouching time.
The filter will in all probability undergo some refinement earlier than it’s lastly handled as completed, however there’s additionally little question that it’s an thrilling time to be a Photoshop picture editor!
Comfortable retouching!